|
Making Ladders is Simple. My previous tutorial explained how to make them but
the hard way which also uses up more memory. EutecTic
of The Node passed on
some info about making ladders much easier.
1.) Make a rectangle brush and make it how ever tall you want, this is going to be
the part of the ladder you climb. Now on each end of the ladder make a pole. This is
obviously the poles holding the bars of the ladder together! Make them as tall as the 1st brush.
Use Fig. 3.3-a to the right as a reference.
2.) Choose a decent
pole texture for the 2 poles and apply it to them. You probably
just want to choose a plain wood or metal texture. Now for
the middle brush which will be what you climb. There are certain
textures which have a magenta
background ( a la Duke 3D ). In the editor you see it as magenta
but in a compiled map the magenta
sections are transparent. So for a ladder effect you want
to use some textures which look like bars going across a magenta
background , some can be found in the directory "generic/trim",
they are the ones with names starting with Ladder. Choose
one and apply it to the brush. Now re-size the brush so that
very top starts with a bar and the very bottom ends with a
bar. Also on the top and bottom face of the brush, you may
want to rotate the texture 90 degrees in either direction
then shift the face so it looks like a bar. Make it as thin
as possible to give it a realistic ladder look. Change the
grid size to 1 and center the ladder in the middle making
it 1 Unit wide. Use Fig. 3.3-b on the right as reference.
3.) Right now it only looks like a
ladder but you can't climb it. To make it climbable, select
only the ladder brush that are the bars you will climb. Open
the Surf Inspector ( "S" ) and checkmark the box beside "Ladder"
in the content flags box. You may now climb the ladder.
Note, you may give the "Ladder" property to any brush to make it climbable, such as pipes, walls and so forth.
You may think about using these techniques to make secret areas in your map.
4.) Time to make a choice. There are 2 different ways to make a ladder.
The problem is that you can only do one or the other. The first way is if you want to make a
ladder that you are able to shoot through the transparent sections. The problem with this one
is that when your near the ladder you see two different bars for each step, as in Pic A under
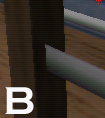
this paragraph. In Pic B you'll notice that there isn't two bars, so it looks normal , but in
this one you cannot shoot through the transparent parts. So if you are trying to shoot an enemy
on the other side of the ladder , it won't hit them.
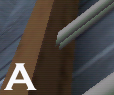
A.) Fence Technique : To make Bullets go through the holes, open the Surf Inspector and checkmark
"Fence" in the Content Flags Box. This will also let light pass through the brush so that it will
cast a bit of a shadow from the bars of the ladder! Note, since its using the fence property, you will be
able to see double bars, as mentioned above and seen in Pic A.
A.) Easy Way : This technique is in Pic B above. This is best if you have a
ladder against a wall. If it's against the wall you will notice that there is a big shadow on the
wall. To fix it so that light hits the wall, select the brush, go to the entity view and double
click on func_wall. This makes it so that the light may pass through it.
Note : While playing in the level you may notice a line in the ladder where
the ladder brush is. It may be a bit unsightly but I do not know a way around it except using
shadows in a clever way as to cover up the line. An example is Fig. 3.3-c on the right.
Now you can save and compile your level. If you did all this correctly then you now have a Ladder in your level.
|