
|
UberTools GDK Level Design Scripting Older Documentation Other |
TIKI Model System
The TIKI model system is designed primarily with modularity in mind. Traditional engines use a monolithic file format to represent their models which limits the use of a particular model or set of animations. The TIKI system solves this by creating an easy and convenient way of making many different models with the same set or subset of animations. The TIKI system works with either 3D Studio MAX or Lightwave.
Before the internals of the system are explained, it is very important that one learns how to use Visual SourceSafe effectively. Visual SourceSafe is an application that allows one to make multiple revisions of a file and log those changes so that at any time, one can access any previous version with a simple mouse click. The reason this is crucially important because as the assets increase it will become an ever-increasing job to maintain all the assets. Since the artists and modelers are the asset creators, it will be your job to make sure that the assets are kept up to date and correct. Here is a breakdown of concepts that are important with SourceSafe: checking in files, checking out files, Setting one’s working folder, Showing history of a particular file. Since explaining these concepts has already been covered in the documentation for SourceSafe, they won’t be covered here.
The TIKI model system employs three different kinds of assets: the TIK file, a number of TAN files and a number of TGA files. The TIK file is the main file of the TIKI model system, it defines all the different animations to be used for a model as well as which textures are to be used and any unique information for that model. The TAN file is a proprietary format that is created by LW2TAN for Lightwave and MAX2TAN for 3D Studio MAX 2. The TGA file is the native format for the textures used to comprise the skin of the model.
The TAN file
The TAN file is a TIKI animation file, it is the basic building block of all models. A TAN file can be created in one of two ways, using the LW2TAN utility for Lightwave or using the MAX2TAN exporter for 3D Studio MAX 2. Any animation can be converted to a TAN file provided that it meets the following requirements:
- It must have texture coordinates assigned. Either through a uv file in Lightwave’s case or have them present in the model for 3D Studio MAX.
- All animations must match each other in terms of number of surfaces, number of triangles, number of vertices, and number of tags.
TAN files support a bunch of unique features including: tags (bones), origin and surfaces.
Tags
A tag simply defines an attachment point for other models. It is defined by a single triangle whose material’s name starts with the name “tag_”. The number of “tags” must be consistent throughout all TAN files for a given model. So there can’t be 3 tags in one animation and then 5 in another animation. The tag triangle should be a right triangle which “points” straight ahead. This triangle not only defines the position of an attachment point but also the orientation of the attached model. Therefore, the orientation of the right triangle is crucial. The tag triangle should not be equilateral, it should be orientated as follows:
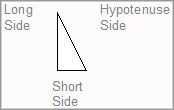
There are three sides to the triangle: the hypotenuse, the long side
and the short side.
The long side should point forward along the X Axis.
The short side should point to the right, along the Negative Y Axis.
The normal of the triangle should point straight up, along the Z Axis.
The hypotenuse should look like a \.
Origin
The origin tag is a special tag that can redefine the origin for each frame of the animation. It is defined the same way as a normal tag (a right triangle whose material’s name is “origin”). The origin tag is the tag which is used to determine movement inside an animation. The origin tag should always be placed in the same relative position to the model unless the displacement is intended. For example, lets say a walking animation is to be exported. The model starts at the origin on frame 0 and then walks to (100,0,0) within 10 frames of animation. If the animation contains 10 frames of animation than the origin triangle would be placed at the following locations for each frame:
The exporter or conversion utility automatically moves each frame “back to the origin” so there is no need to auto-center the model oneself.
Surfaces
Surfaces define how the model will be broken up. Each surface can have
only one texture or shader active on it at any given time. Therefore by
skinning the model and breaking it up into two different skins, 2 different
surfaces are automatically created. Even though textures are assigned
in a program like Uview or within MAX, one still needs to define which
texture or shader will be used for each surface, this is done in the SETUP
SECTION of the TIK file. The way that surfaces are created (which triangles
go to which surface) is very important in that it defines the different
parts of a model. Splitting the model up into multiple parts allows one
to turn on or off or apply special effects to distinct regions of the
model. Surface naming is also critical in that it defines a hierarchy
that will be used in the game to determine what part of the model is what
(the game will look for keywords like head, torso, arm, leg etc.). The
surface naming convention is explained below.
General Guidelines
Standard Tag Names
There are certain “default” tag names that should exist in a model.
- ORIGIN
The standard name of the origin tag.
- TAG_WEAPON
If a model is going to be carrying a gun and that gun is a separate model (it is not integrated into the model) than the model should have a tag named “tag_weapon”. This tag should be placed in the hand of whichever arm the model will be wielding the weapon.
- TAG_BARREL
If a model is a weapon or the model has a weapon integrated into it, it should have a tag named “tag_barrel”. This is the tag at which muzzle flashes will be attached as well as where the projectile or bullet will be fired.
- TAG_HEAD / TAG_TORSO
If the model is a multi-segmented model with separate head, torso and legs, than the following tags must exist: In the legs model a “tag_torso” must exist. This is the attachment point of the torso to the legs. In the torso model a “tag_head” must exist. This is the attachment point of the head to the torso.
If the model will have limbs chopped off and the intent is that the model spurt blood or something else from the location of severance, than a tag must be created at that area. If one chopped off the left arm than the tag would be called tag_arm_left and would be located at the left shoulder joint.
STANDARD SURFACE NAMES
The surface naming convention is hierarchical, in that any part that is part of a larger part has that larger part as the beginning of its name. For example, if one have a pair of glasses on a model’s face than the surface describing the head might be called “head” and the surface describing the glasses would be called “head_glasses”. This way one can instantly tell that the glasses belong to the head. The naming convention does get a bit confusing at times, but this way if one blows off someone’s legs_left_high, one can delete all the surfaces which begin with “legs_left_high” that includes “legs_left_high”, ”legs_left_high_low” and “legs_left_high_low_foot”. Here is a list of surface names which should be used as much as possible and wherever applicable (these surface names are for a standard biped, and one’s creature may not be bipedal in nature). Also, not all these surfaces have to exist by any means, in fact it is desirable to have as few surfaces as possible.
- head
- head_hair
- torso_front
- torso_back
- legs_left_high
- legs_left_high_low
- legs_left_high_low_foot
- legs_right_high
- legs_right_high_low
- legs_right_high_low_foot
- arm_left_high
- arm_left_high_low
- arm_left_high_low_hand
- arm_right_high
- arm_right_high_low
- arm_right_high_low_hand
For severed limbs, one would implement “cap surfaces”, these would be surfaces which would be turned on to cap off severed portions of the model. They would utilize the naming convention as follows. If one blows away the arm_left_high, than the cap surface one would use would be cap_arm_left. If one blows away the arm_righ_high_low_hand surface than the cap that one would use would be cap_arm_right_low.
The TIK File
The beginning of a TIK file must always start with the “TIKI” identifier. The rest of the TIK file is made up of sections. A TIK file is broken up into 3 distinct sections, the setup section, the init section and the Animations section. The setup section is the section in which all surface definitions are made as well as things like global scale and global origin offset. The Init section contains all setup events for a given model for both the client and the server. The Animations section is where all animations are defined. This section also contains the individual frame definitions for each animation in the model.
General .TIK Info
A TIK file can be created with any text editor. For those that do not have a preference, Notepad is a simple text editor included with Windows 95/NT.
The TIK file supports some unique parsing tools that can make one’s life easier. First of all, a TIK file can contain any number of Setup, Init and Animation sections, there doesn’t have to be just one of each. This has no real application for a single TIK file but makes more sense when one considers the next feature of TIK files. TIK files support two unique keywords which are $define and $include.
$define <macro_name> <macro_expansion>
This allows one to define a macro that will be automatically substituted
in the TIK file. This feature is especially useful when one has a filename
or some piece of text that is used over and over again and may change
at any time. Macros can only be used in the file once they are defined,
so a macro won’t be substituted correctly until it has been defined.
Macro definitions can be placed anywhere in the TIK file regardless of
which section is currently being processed. Here is an example:
When the shader definition for the head is parsed instead of getting “$texpath$nostril.tga” as a texture name. The macro would be properly substituted and one would get “textures/gorilla/head/nostril.tga”. Macros must be surrounded by the “$” to be properly substituted.
$include <filename>
This allows one to include another file into the current one. What this
means is that the included file will be parsed from then on in the TIK
file until the included file’s end has been reached. This allows
one to include a “common” TIK file that has the basic animations
and setup information for a particular group of models and then make only
a few minor changes in this TIK file.
Comments may be created in TIK files at any time simply by starting the comment out with “//”. Once the double slash is encountered, the rest of the line will automatically be skipped.
.TIK Setup Section
The format of the setup section is as follows:
The following are valid setup keywords: scale, path, origin and surface.
- scale <global scale value>
Allows one to globally scale the model, where 1.0 is the default scale.
- path <subpath>
This will be prepended to all TGA and TAN files. One can use the “path” command to specify a subdirectory where all the files are located.
- origin <x y z>
Apply a global origin offset to all animations. This allows one to re-position a model without having to re-export it.
- lightoffset <x y z>
When lighting the model, apply this offset to the lighting sample location. This can be used to fix models whose centroids occasionally drop below the origin.
- surface <surface_name> flags <flag_keywords …>
surface <surface_name> damage <damage_multiplier>
surface <surface_name> shader <shader_name>
- surface_name
This is the name of the surface to modify. This can also be “all” to apply to all surfaces or utilitze the “*” to modify multiple surfaces at once. For example, given that we have a model with all the default surfaces defined. If the surface_name is “legs*”, then all surfaces beginning with “legs” will be modified.
- flags
This allows one to modify default surface attributes utilizing the following keywords: skin1, skin2, skin3, nodraw, twosided, nodamage, nomipmaps.
- damage
This allows one to specify how much the damage should be “amplified” or scaled when damage is inflicted upon this surface.
- shader
This allows you to specify which texture will be used on which surface. If the “shader_name” ends in a “.tga” then that texture will be used. If it does not end with an extension, then the “shader_name” will be assumed to be a valid shader registered in some other “.shader” file.
- surface_name
.TIK Init Section
The format of the init section is as follows:
Client initialization events are executed when a model is registered on the client. Server initialization commands are executed when ever the model is spawned on the server
.TIK Animations Section
The format of the Animations section is as follows:
Each animation is defined by an anim_alias followed by a TAN file. The alias allows one to rename the animation so that it can adhere to a naming convention, without having to rename all the TAN files to the same name. It also allows the same animation to be used multiple times with different effects. The braced section following an animation define the events to be processed on the client or server at specific frames of the animations.
- frame_num
This is either a specific frame number from 0 to the number of frames in the animation minus one. This can also be one of the keywords: start, end, first, last, every, entry, and exit. The exit keyword means that that command will be executed whenever leaving that animation. The entry keyword means that the command will be executed the first time you enter an animation, all subsequent loops of the animation will not call this event. Both entry and exit can only be used on the client.
TGA Files
TGA files should be 24-bit unless it is absolutely imperative that the texture needs to utilize an alpha channel. This would only be the case if the texture and model utilized masking or alpha effects
3D Studio MAX Tools
UVOUT
This is a plugin for 3D Studio Max 2.0. It outputs the texture coordinates,
triangle definitions and surface definitions to a file with a UV extension.
This file is later read by MAX2TAN. You can simply rename your surfaces
by editing this file manually. Surfaces are defined in 3D Studio Max by
assigning material id’s to various faces. When the UV file is generated,
you will see the material id’s appear at the top of the file. By
default the materials are named material# where # is the material used
inside MAX. Simply rename material# to tag_origin or torso or whatever
name makes the most sense.
ANIMOUT
This is a plugin for 3D Studio Max 2.0. It outputs animation information
for a given model. It will create a file with a ANM extension. This file
is later read by MAX2TAN. The ANM is a binary file and cannot be edited.
MAX2TAN
This program converts 3D Studio MAX ANM and UV files to the TAN format.
All animations must have an appropriate UV file for texture coordinate
assignment. When converting an animation, it will check for the presence
of the destination and only re-grab the source if the time/date of the
source is newer than the destination or the –force option is used.
MAX2TAN has the following options:
- animname
The name of an ANM file created by ANIMOUT.
- uv
If a uv file is not specified, a uv file will be looked for called “animname.uv”. This allows one to create one uv file for a model and use it for each animation.
- force
Causes MAX2TAN to re-process the animation regardless of what the time and date of the destination TAN file is.
- scale
Specifies a scale to be used when converting the file. The default scale is 1.
- ignore
Specifies an external file which contains a list of surfaces to ignore when grabbing this model. This is used extensively when grabbing a multi-part model.
- origin
Specifies an alternate surface name for the origin. Normally, the origin surface is simply called “origin”, this allows one to choose an alternate surface name for the origin. This is used extensively when grabbing a multi-part model.
- dest
Specifies an alternate destination name for the TAN file, normally the TAN file shares the same name as the animname but with a TAN extension.
- nolod
Do not create an LOD mapping for this model.
- verbose
Outputs a lot of information while processing the model.
- noclampz
By default, the Z component of the origin tag is clamped to only positive and zero values. If you would like to allow negative Z values, use this option.
- zeroz
Always set the Z component of the origin tag to zero.
- rotate [yaw]
Rotates the model before processing.
- reverse
reverse the order of frames of the animation.
- noorigin
Tells max2tan to not subtract the origin’s position from the model’s position. No movement deltas are produced.
- clearz
Specifies that Z movement is cleared out on deltas.
- clearxy
Specifies that X and Y movement is cleared out on deltas.
Testing TIKI models
The following commands allow one to test a TIK model inside the game
- viewspawn <modelname>
Spawns a viewthing with <modelname> as the model.
- viewmodel <modelname>
Sets the model of the current viewthing
- viewthingnext
Makes the next viewthing in your world the current one.
- viewthingprev
Makes the previous viewthing in your world the current one.
- viewnext
Increments the current frame of the current viewthing.
- viewprev
Decrements the current frame of the current viewthing.
- viewnextanim
Increments the current anim of the current viewthing.
- viewprevanim
Decrements the current anim of the current viewthing.
- viewanimate
Toggles the animation of the current viewthing. 4 states, off, on, on with movement, on with movement and looping.
- viewscaleup
Increments the current scale of the current viewthing.
- viewscaledown
Decrements the current scale of the current viewthing.
- viewscale <scale>
Sets the scale of the current viewthing.
- viewyaw <angle>
Sets the yaw of the current viewthing.
- viewdelete
Deletes the current viewthing.
- viewattach <tag name> <fully realized path name of model
to attach>
Tag name is the name of the tag to attach to, fully realized path name would be like <models/grunt.tik>, normally on viewspawn and viewmodel commands you don't need to prepend models/, but in this case you do.
- viewdetachall
Detach and delete all my children.
- vieworigin <x y z>
Specifies an absolute position for the viewthing.
- viewangles <pitch yaw roll>
Specifies new angles for the viewthing.
- R_lodscale
Adjust the global LOD scale for all models, default is 5. Lower values increase LOD, higher values decrease LOD. You can easily bind two keys to change the CVAR like so:- Bind key1 “add r_loadscale 0.25”
- Bind key2 “add r_loadscale –0.025”
Older testing commands which are being phased out:
- Testmodel <model.tik>
Spawns a test model in front of the player. - testscale <scale value>
Changs the scale of the test model. - testscaleup
Ups the scale of the test model. - testscaledown
Downs the scale of the test model. - testanimate
Toggles the animation state of the test model. One toggle animates the model in place (without movement information). The second toggle animates the model with movement but resets the movement after each animation loop. The third toggle animates the model with movement and continues looping. The fourth toggle resets the model to not animate and brings it back to its origin. - testorigin <x y z>
Specifies a new origin for the given model. - testangles <pitch yaw roll>
Specifies new angles for the test model. - Nextframe
Goes to the next frame in the current animation of the test model. - Prevframe
Goes to the previous frame in the current animation of the test model. - Nextanim
Goes to the next animation in the test model. - Prevanim
Goes to the previous animation in the test model.
A Sample TIK File
| TIKI | // All TIKI files must have this at the // beginning of the file |
| setup | // The setup section |
| { | |
| scale 1.1 | // specify a scale of 1.1 |
| path models/sample | // set the path for all files to // models/julia |
| surface all shader eden_julia_dam5.tga | // set all surfaces to use // eden_julia_dam5.tga as their // default texture |
| } |
|
| $define playerdir player/julia/taunts |
// define a macro called playerdir |
| init | // The init section |
| { | |
| server | // the server init events |
| { | |
| setsize "-16 -16 0" "16 16 40" | // override the default bounding box |
// // create some default taunt sound aliases // aliascache snd_taunt1 $playerdir$/getbent.wav" aliascache snd_taunt2 $playerdir$/gtthrt.wav" aliascache snd_taunt3 $playerdir$/mkmybtc1.wav" aliascache snd_taunt4 $playerdir$/rcknrll2.wav" aliascache snd_taunt5 $playerdir$/rstnpcs.wav" aliascache snd_taunt6 $playerdir$/schldy.wav" aliascache snd_taunt7 $playerdir$/trynw1.wav" aliascache snd_taunt8 $playerdir$/whsyrdd1.wav" aliascache snd_taunt9 $playerdir$/harry.wav" } |
|
| client | // the client init events |
| { // There are no initialization events for the client } } |
|
| animations { |
// The animations section |
| idle f_edenjulia2.tan | // create an animation called idle |
| taunt f_edenjulia2.tan | // create an animation called taunt |
| { |
|
| client | // client events for the taunt anim |
| { | |
| first playsound snd_taunt | // on the first frame of idle play // a taunt sound |
| } } } |
|
| Copyright ©2003 Ritual Entertainment, Inc. All rights reserved. Please do not email Ritual Entertainment with questions about the UberTools Game Development Kit. It is provided as is and is not supported by Ritual Entertainment. |